Flintknapping Time-lapse

This is the probably the last of the mini-series from my visit to Dan Stueber’s flintknapping class at the University of Victoria and is about a time-lapse video we made of Dan pressure flaking a small corner-notched projectile point. The point would be suitable for use as an arrowhead or on an atlatl dart.
The video below is a timelapse that shows Dan pressure flaking a flake of stone to shape it into a tool. The video is rendered at 8 fps from 1,266 frames shot at a 1 second interval. In a couple of places I have inserted a string of image duplicates to briefly freeze the action. Total elapsed time for this sequence was a bit less than 22 minutes.
Below the video are selected stills to illustrate different aspects of this method, followed by a gallery with more examples.
Click on the image below to launch the video. I recommend clicking on the wheel symbol in the lower right and raising the resolution level, and maximising the view so you can see more detail.
.
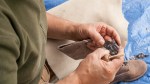
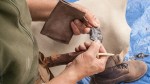
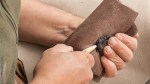
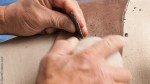
Pressure flaking is a method used once you have reduced a larger piece of stone down to a workable size, called a blank, such as the flake in the picture below. Preparing the blanks can be done with percussion using a hard hammer like another stone, or a soft hammer like a chunk of antler or very hard wood, or both in succession. Pressure flaking involves using a pointed tool that is softer than stone such as antler (copper is often used by modern flintknappers) – this allows a bit of grip when applying pressure so the tool does not slip off. The tip of the flaker is placed on the edge of the blank and pressed with considerable force until a flake pops off. The placement of the flaker tip and the angle of the pressure have to be just right. You will notice in this video that a lot of the force for applying pressure comes from the legs with Dan’s legs moving back and forth as he flakes.
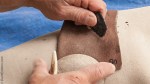
Once one flake is removed, then typically the flaker is applied right next to it, and the next flake comes off along the ridge left next to the previous flake scar. This is repeated around the margins of the blank, with emphasis on shaping the tool and removing flakes from both faces in a symmetrical manner. However, this flaking action also thins out the edge where the flakes are being removed, and once it gets too thin or irregular then it starts to weaken. A weak edge provides a poor platform for pressing off more flakes and has to be strengthened. This is typically done by grinding the edge a bit with a stone or a bit of antler – you will see Dan do both in this video, the antler is part of the tool and he uses it near the end when doing fine finishing. Otherwise it is done with a stone which takes off more at once.
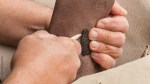
Final finishing is sometimes done with a finer tipped tool, and for notching the corners in this video Dan uses a spatulate tipped antler flaker which at one angle has quite a small profile.
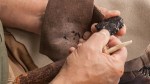
Finally, when all is done, Dan signs his piece using a diamond tipped scriber. Signing the work is important for two reasons – one is that it prevents the tool from entering the underground market of “pot hunted” projectile points which are dug up from sites by vandals – in a small way this helps diminish that market. These people call themselves collectors, but in their greed for rare or perfect artifacts they destroy the three dimensional relationships that exist in a site. The kinds of data that are of interest to archaeologists, and essential to understanding past lifeways and human behaviour are found in the spatial arrangements of the artifacts and the other remains like hearths, living areas, discarded bones and even chemical changes or DNA preserved in the soil – excavating a site destroys these relationships, and digging indiscriminately just for artifacts without recording the other information removes this unique information forever, and is comparable to burning the only copy of a book, or for some sites a library of unique books.
Another reason to sign your work is that it is your work – people like Dan are masters at their craft and they should signify it as their art. These objects can be timeless and many will end up in collections at museums, art galleries and private homes and persist for centuries. The artists deserve to be remembered. Look at the link for Dan’s website to get a sense of the mastery – he has taken it to an amazing level.
The images below are not always crisp. This is because I had to fix the focus on a point that would do for all of the timelapse (I probably should have used even greater depth of field), the images are cropped quite a bit since I framed it generously to allow for Dan moving around but found I could zoom in quite tight in post, and also because I chose a slower shutter speed as this makes for a better timelapse video, at least when created 24 or 30 fps video. We decided after looking at this sequence at 24 fps, 12 fps and 6 fps that a slower rate of speed was more educational as it gave the viewer more time to see what is going on. Ultimately I settled on 8 fps as a bit smoother than 6 fps. If I had known in advance I would end up at this rate of speed, I might have shot each image at a slightly faster shutter speed to get them a bit sharper. But, it works pretty well like this, so I am satisfied with this first effort. Dan and I hope to do some more of these when he is next in town.

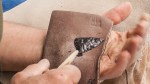
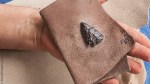
The starting point, a lightly prepared flake.
.

Flaking underway, examining for next steps
.

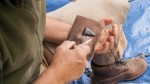
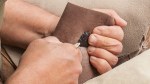
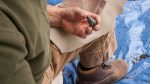
Using a hammer stone to make the platform more stable to allow controlled flaking to continue
.

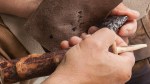
Finishing the base prior to notching the corners
.

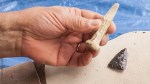
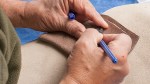
Flaking notches into the corners
.

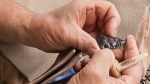
Corners nearly finished – note the finer antler pressure flaker used for this stage.
.

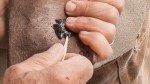
Signing the work with a diamond tipped scribe
.
To open the gallery, click on any thumbnail below, navigate with the arrows and escape to return to this page:
-
- The blank, a lightly prepared obsidian flake
-
- Where to start the flaking
-

- The zoomed out view from which video is made
-
- Pressure flaking, little flakes are removed systematically.
-
- The “platform” from which flakes are removed needs strengthening and is ground down with stone
-
- More platform preparation
-
- Marginal flaking continues
-
- Another quick look to see how it is shaping up.
-
- Beginning to get there.
-
- Pretty much ready for finishing
-

- Finishing the base
-
- Finishing the base detail
-
- The notching tool, antler.
-

- Notching the corners of the base
-
- More notching
-
- Finishing touches
-
- Nearly finished
-

- Tiny bit left
-

- Cleaning up the notches
-
- Signing with a diamond-tipped scribe
-
- Finished
.
.
Canon 5Dii, SMC Takumar 35/3.5 lens, ISO125, f-8, 1/50th. Shot at 3861×2574 pixels and cropped to 2204×1240 for rendering into a video. Edits were done in Lightroom 4 and LRTimelapse, video editing in Windows Live Movie Maker.
.


Hi,
I posted before and for some reason it doesn’t show up. ehpem, Thanks for all the time and hard work you put into this time lapse video production, capturing all the photos of the process and the excellent description of what I was doing. The only thing missing is a bit of a music score and we both know a great keyboardist that could whip one out! Maybe for the next installment? I look forward to doing more when I’m back in Victoria.
For those interested in my course at University of Victoria, it is: ANTH 315, Living Technologies. The course is offered through the University every summer, usually in June. Besides filntknapping, students learn pecking and grinding technologies which includes making a stone bowl, or something similar, grinding a slate projectile point or knife, making a bone awl, hafting (attaching), with hide glue and sinew, a finished stone point to a foreshaft for use in throwing the atlatl. All the technologies are taught with a perspective on North American and world archaeology. If you have any questions you can reach me at dan@thunderstones.com.
Thanks,
Dan Stueber
LikeLike
Hi Dan,
I don’t know where your earlier comment went – not into my spam folder anyway.
Thanks for coming by and giving all this extra information. I did not know the full range of what you do in the course so it is good to have that all spelled out. I have heard rave reviews from your students, so I know the course is well worth taking and recommend that people do so.
LikeLike
And, you are right about a sound track. I will have to propose that to a certain musician of our mutual acquaintance. In fact, I did for a more nature oriented timelapse and he seemed interested.
LikeLike
What a great project and series, Ehpem! Love the video and how you can see the piece coming to life like that! Top drawer!!
LikeLike
Thanks Toad – I know you were waiting for this to be finished and I’m glad that you like how it turned out.
LikeLike
I had no idea about Flintknapping until your fascinating series of posts. The time lapse really helps to give us all some idea of how skillful this process is.
LikeLike
Hi Andy. I am glad you are learning something from these posts. This kind of pressure flaking does take a lot of skill, but there are many aspects of flintknapping that require more sophisticated methods and approaches. I hope to get some of those sequences onto video at some time as well.
LikeLike
This has been fascinating; seeing a true artisan at work (captured very well by your photography) also having stood in places here in Oman that are know flint factories, I am even more in awe of the skill involved making these tools.
Great post.
David.
LikeLike
Hi David, thanks for the comment. I too am in awe when watching such skill at work. I am very grateful to Dan for his cooperation, and we are talking of doing more.
LikeLike
I shall look forward to it.
David.
LikeLike
Too bad the prehistoric flint knappers didnt sign their pieces too! You could work your way back in time through their overlapping lives, like in dendrochronology… but maybe thats possible anyway, using stylistic markers?
LikeLike
Hi Valerie,
I know that archaeologists sometimes conclude, for a particular site, that they are sure that pieces x,y & z are made by the same person. And I would imagine that sometimes makers either did something in a certain way that is identifiable, or perhaps even to mark a piece as theirs as part of some smaller collective they belong to. It stands to reason really since this was done for other things that people make.
However, It seems more common that an arrow or dart would be marked to indicate the owner, and those marks almost never survive. In basketry and textiles there seems to be more of that kind of information – marks made to denote individual or family or other social group. The trouble is that there is a very small sample surviving in the archaeological record so disentangling the larger group identities from the smaller is extremely difficult.
LikeLike
Wonderful post! Great job on the time lapse.
LikeLike
Thanks Ryan, glad you like it.
LikeLike
This is a fascinating process and the TL is very well done. Dan is a true artist and very creative with his technique. I’d love to take his course.
LikeLike
Hi Ken. I’d love to take his course as well, I know that I would learn a great deal.
LikeLike