
Restless for Film IV

Film Scanning Profile: Fuji Neopan 400, 600 dpi
My series of experiments with the Olympus Pen half frame camera continues. Today is about scanning negatives and some of the experimenting I did once I got my processed film home. Here I show examples of the same set of brackets scanned in different ways. These are the third scene I photographed with this camera, without the aid of a light meter, using the Sunny 16 rule and compensating for backlighting.
The negatives are scanned with an Epson Perfection V700, a great scanner, using the bundled Silverfast SE software. That software has a plug-in (I suppose that is what it is called) called NegaFix which includes presets (or as they call them, “profiles“) for many different types of film – negative, positive, colour, black and white. However, it does not have a profile for the film I was using – Fuji Acros Neopan 100. They do have one for the 400 version of Neopan, and I used that for my initial scans. After doing some reading, I decided to try some other profiles, all of which needed one level or another of adjustment prior to scanning. Profiles and scanning resolution are listed in the captions. At the bottom are some 100% crops from the image below which was scanned at 6400DPI (the scanner will do 12800, but I did not go there) – its kind of hard to find the grain in this film.
These images have not been adjusted in Lightroom other than a small amount of sharpening and clarity. The crops at the bottom have some contrast and brightness adjustments as well.

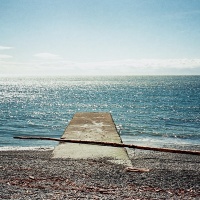
Film Scanning Profile: Fuji Neopan 400, Resolution 6400DPI
.

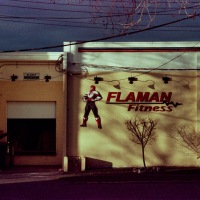
Film Scanning Profile: Kodak Tmax 100, Resolution 3200DPI
.

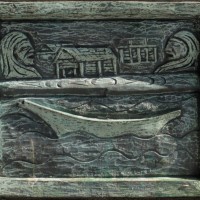
Film Scanning Profile: Kodak Tri-X 400, Resolution 3200DPI
.

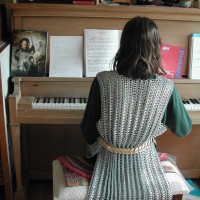
Film Scanning Profile: Kodak Tri-X 400 different brightness and other settings, Resolution 3200DPI
.

100% crop from second image, 6400DPI
.

100% crop from second image, 6400DPI
.

100% crop from second image, 6400DPI
.
Olympus Pen, Half Frame, 28mm lens, Fujifilm Neopan Acros, ISO100, Epson V700 Scanner


I think you will find tiff will give you far more flexibility when processing in Lightroom and storage is quite cheap now ? Wait till you try the 6×6; 500MB files are easily obtained.
Jpeg will rapidly degenerate the more you work on the file. Experiment by looking at the histogram of both formats with similar adjustment being done – the jpeg will be full of gaps…..
You are right about colour Negs and more so E6 slides – they change colour after a number of years unless stored carefully. B&W if processed correctly will last forever ! (although I have seen 60 year old negs that were thrown in the chemicals & still good as the day they were processed) it all comes down to the fix used and careful but not over washing.
Have fun….
David.
LikeLike
Thanks David. That is good to know as you obviously have experimented. I will need to as well – I suppose it partly depends how close the scan is to where I would like to end up. And, I could work in a tiff till satisfied and then output to a jpeg for printing and so on, and delete the tiff. Though I suspect I might not be able to hit the delete button all that easily… I am going to have fun! Thanks
LikeLike
Just for info – most newer printers will take a 16bit tiff without a problem.
David..
LikeLike
The ability of film to remain stable for years is mostly due to the storage conditions it’s kept in. Archival sleeves and a cool, dry area that is free of airborne contaminates is probably the best condition for storage. That usually means a constant climate controlled area. For a small quantity of film it could just be a freezer, as long as the negs are sealed in a moisture barrier bag.
LikeLike
We are very fortunate in Victoria to have a moderate climate throughout the year – large fluctuations in temperature and humidity are unusual. Not only does it help for storing things like photographs, wooden musical instruments and furniture are very happy here.
LikeLike
Interesting series of shots. We use an Epson Perfection scanner at the Museum and I set it up to use a neutral set point or preset so that all the scans look as close to the original. It’s a technique I learned while working at the George Eastman House. In the scanning process negatives are scanned as negatives and positives (slides and prints) were scanned as positives just because they didn’t want their records digitally altered. For reproduction purposes though the negative files were reversed in Photoshop (or whatever software you have). The scanner presets seem to try to reproduce the look of a film type and I don’t have any experience to know if they are successful at doing that but I would guess a neutral scan can be adjusted in LR to give very much the same effect. I think even saving as jpgs or TIFF files there is still enough latitude for LR to make a decent adjustment.That is one more thing i’d like to add and that is both Museums save scans as TIFF format. I know that this format makes for a huge file so I wouldn’t blame anyone for not using it but it’s their belief that it is more of an archival format than jpg.
LikeLike
Hi Ken – thanks for the information. I think there is a lot of value in scanning neutral, though for me it is a huge help to have them converted to positives on the way by as LR is not great at that conversion. I have been saving as TIFFs but they are huge. I was interested in seeing what I could get to without having to do much work in LR or elsewher, and if I find something that looks really good with this film, I will stick with that and adjust as necessary in LR afterwards. A big part of the learning curve is going to be getting the process a bit more automated. So far the scanner has been pretty poor at detecting the frames, so I have had to do those manually. Also, since I am probably going to be treating multiple images on the film as a single photograph, I will be needing to select those manually anyway. But, the less fiddling around after that, the happier I will be. I also need to experiment with the jpeg format to see if it can be worked with well enough to save a lot of disc space, and if I want a bigger file for printing or something, then make one at that time.
LikeLike
If this were my project I would not scan in TIFF format, only jpg. The reason is that the TIFF format is probably more archival but so is the actual original negative. Edits made in Lightroom are non destructive, even on jpgs. If you have to edit in another program you can edit a copy or even a “virtual copy” and your original file stays intact. And, if this is an ongoing project, you’ll save a huge amount of disk space.
LikeLike
Thanks Ken – I am going to scan in both for a few tests and see if there is much loss in control. I have been noticing that the scanned images have a great deal less latitude than the DSLR images when it comes to editing, so it might not make a lot of difference. And, disk space is going to be a problem. I like you observation that the film is already an archive – especial true for the true black and white. I wonder if the colour processed black and white is as stable as the other, or if it is more akin to colour and those only good for a few decades.
LikeLike